Aquisition
The process of acquiring images ranges from snapping a single image to recording overnight (or longer) time lapses of samples from N different angles. See Acquisition Controls for detailed descriptions of the controls.
Acquiring a Single Image
To acquire a single image using the OpenSPIM plugin:
- Navigate the 4D stage to the location you want to image (see Operation for details).
- Set Stack Depth to 0. This will limit the position to a single plane. (You should not need to change the Step Size.)
- Click Stack at this Z plus: to add this plane to the position list.
- You may specify an Output directory if you would prefer the image be written straight to disk as an OME-TIFF, rather than opened in Fiji.
- The other options have no effect for a single plane, with the exception of Snap Continuously (which should be unchecked).
- Finally, click Oh Snap! to take the image.
Acquiring a Stack
Acquiring a single stack is very similar to acquiring a single position.
- Begin by navigating to the place the stack should begin.
- Specify the Stack Depth in μm, and the Step Size (also in μm).
- Click Stack at this Z plus: to add the stack to the positions list.
- Configure whichever settings are desired:
- The Set Z-stage velocity and Z settle time controls may be useful for reducing jitter.
- Snap Continuously can be used if recording at the precise locations specified for your stack is of less importance than acquiring images constantly.
- Update Live View will display each slice in the Live Window as it is acquired (allowing you to abort the acquisition early if necessary).
- Lase Full Stack is not generally necessary when recording a single stack, as the reduced time between slices is negligible.
- Though a single stack can easily fit into memory, it is recommended that you specify an Output directory so the stack is saved in OME-TIFF format.
- Using Asynchronous Output is optional, though it will reduce the time spent acquiring considerably.
- Click Oh Snap! to acquire the stack.
Single-Plane Time Lapse
To acquire a time lapse of a single plane, set up the recording exactly as if you were going to record only one image.
- Enable the Time box and specify an Interval (0 seconds is allowed) and a Count.
- Optionally specify an Output directory.
- Click Oh Snap! to begin the time-lapse.
Multi-View Imaging of a Fixed Sample
To record multiple views of a fixed sample:
- For each view:
- Navigates the 4D stage to the location you wish to record.
- Specify the Stack Depth and Step Size.
- Click Stack at this Z plus: to mark that location.
- Choose the appropriate options:
- The Set z-stage velocity and Z settle time controls are useful for reducing jitter.
- Snap Continuously will record the stacks as fast as possible, rather than at precisely the given locations.
- Update Live View will show each slice of each stack as it is taken.
- Lase Full Stack can reduce acquisition time.
- Choose an Output directory (highly recommended as these data sets can become quite large).
- Asynchronous Output is useful, but not required for fixed samples.
- If your stacks are particularly far apart and your motor velocity is low, you may wish to override the Device Timeout.
- Click Oh Snap! to begin the multi-view imaging.
Multi-View Time Lapses
The acquisition tab makes recording a time lapse of any number of views simple: Simply set up a multi-view acquisition as described above, and then:
- Optionally enable Anti-Drift (long-term multi-view time lapses are where anti-drift truly shines).
- Enable the time controls, then specify an interval and count.
- Once everything is set up, click Oh Snap! to begin the acquisition.
Acquisition Controls
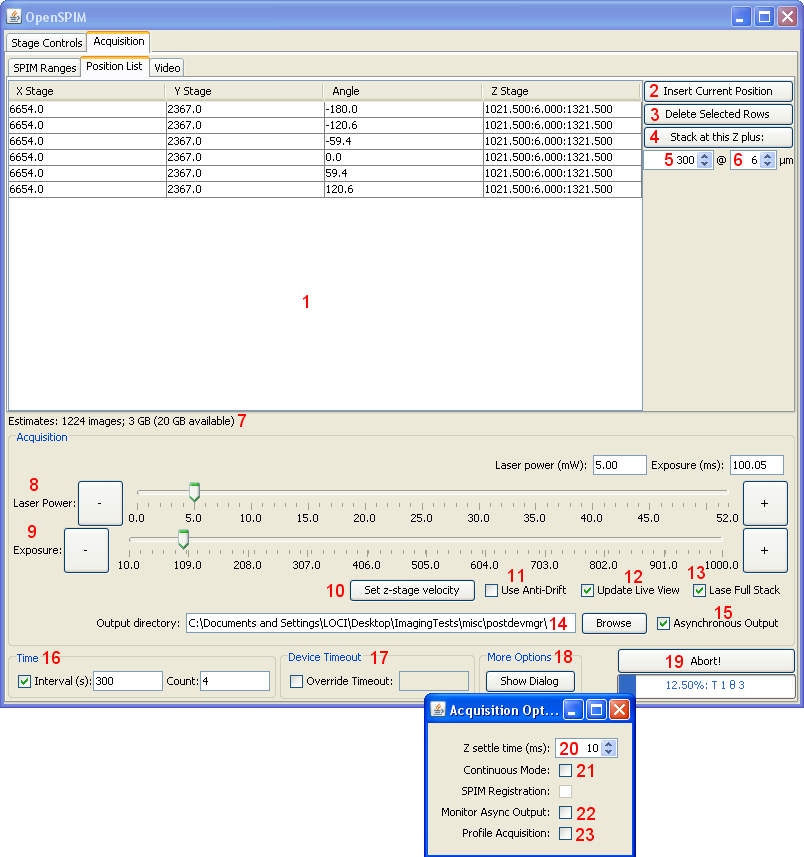
- (1) Positions List
This table shows the list of stacks of images to acquire. Each time point will consist of the images recorded at each position in this list (as well as the Z slices described by the MATLAB range in the final column). - (2) Insert Current Position
Clicking this button will add a row to the end of the table with only the current position; i.e. when acquiring, a single slice will be taken at the given location. - (3) Delete Selected Rows
Clicking this will remove any currently-highlighted rows from the table. You can select multiple rows by shift-clicking (to select a range) or control-clicking (to select individual rows). - (4) Stack at this Z plus
Clicking this button will add a row to the end of the table with the current position of the stage motors and the stack dimensions/step size as entered. - (5) Stack Depth
Any stacks added by the "Stack at this Z plus" button will be this deep, in um. - (6) Step Size
Stacks added by the "Stack at this Z plus" button will advance the motor by this many um in between each slice. - (7) Estimates
This text displays the estimated size of the output dataset, and the available storage space (in RAM or on disk, depending on whether or not the output directory is empty). - (8) Laser power
This slider (and associated number box) will change the laser's output power in 0.01 mW units. Changing this during the acquisition will cause a change in brightness in the recorded images. - (9) Exposure
This slider will control the exposure duration of the camera, in milliseconds. Changing this during acquisition will cause a change in brightness in the recorded images. - (10) Set z-stage velocity
This option can control the speed of the focus motor, to allow for more careful positioning at the expense of additional time for the motor to move. - (11) Use Anti-Drift
In long-term, multi-view time lapses, a common problem is the shrinking of the agarose column containing the sample. Enabling this option will activate interactive anti-drift, to combat this. See Anti-Drift. - (12) Update Live View If enabled, every time the camera takes an image it will update the live window. This can make identifying a shifting sample easy, but may also increase acquisition time.
- (13) Lase Full Stack
By default, the laser will blink for each slice in a stack. Enabling this will cause the laser to remain on for the entire stack, then turn off in between time points. This speeds up acquisition, but can cause bleaching. - (14) Output directory
If a directory is given, the acquired images will be written out as an OME-TIFF dataset. Otherwise, the images will be stored in memory and opened in Fiji after acquisition. Outside of testing acquisition, it is strongly recommended that an output directory be specified. - (15) Asynchronous Output
Rather than writing out each slice as soon as it is taken, if this is checked the images will be buffered and written out as soon as the program finds time. This can greatly speed up acquisition, but if an acquisition fails or is aborted, the metadata in the stored images will be inconsistent. - (16) Time
If the checkbox is enabled, a time-lapse will be recorded.- Interval
The number of seconds between the ideal start of each time lapse. If acquiring a sequence (the entire positions list) takes less time than this interval, the system will wait until the remaining time has elapsed. - Count
The number of sequences to record. Each sequence will record the entire positions list.
- Interval
- (17) Device Timeout
If specified, this will override µManager's default timeout (5 seconds). It should only be enabled if you encounter "device timeout" errors (i.e. if the stage has to move a long distance, but its velocity is too low to cover that distance in five seconds). - (18) More Options
Clicking the Show Dialog button will open the Acquisition Options dialog below the main window. This window contains additional options which may be desired, but are less commonly-used than most others. - (19) Oh Snap!
Pressing this button starts the acquisition. While the acquisition is running, this button will read "Abort!" and can be pressed to cancel an acquisition. - (20) Z settle time
Specifying a time interval here will cause each movement of the stage to be followed by the given delay, to prevent jitter. This will also add time to acquisitions. - (21) Continuous Mode
Rather than take precisely one image each time the motor reaches a position (either in the list, or at a slice within a stack), if this is checked the camera will record images constantly while the stage moves. (In between time-points, the acquisition will stop.) This can cause blurry images, however, since the stage is often moving while the camera exposes. - (22) Monitor Async Output
If this checkbox is checked while Asynchronous Output is also checked, a monitor window will be displayed showing the current state of the async output buffer as it fills and empties. This may be useful if the asynchronous output is providing unusual results. - (23) Profile Acquisition
If this checkbox is checked, the acquisition system will track the time elapsed during certain parts of the process. This may be useful to break down the time usage if the process seems unusually slow.